Wildest Dream Bison Quilt – a paper piecing tutorial

Wow!  It’s been a while since I posted something to my blog.  You see, I’ve been a bit busy.  I bought a quilt shop!  It’s not very often someone can say their dream came true.  But mine really did.  And I am loving it!!!  But it is also a lot of work.  My shop is named A Stitch in Time and located in the mountains of Western NC.  Here is a link to my website if you’re interested in checking it out.

I recently designed a quilt for the bison panel of the Call of the Wild digital collection by Hoffman Fabrics.  And it is exclusive to me.  You won’t find it anywhere else.  The pattern can be found here, and the kit is here.  Or if you just want the bison panel, it is available here.

bison quilt photo.PNG

It’s a simple paper pieced pattern, so I thought I would include a tutorial here for those not real comfortable with paper piecing.

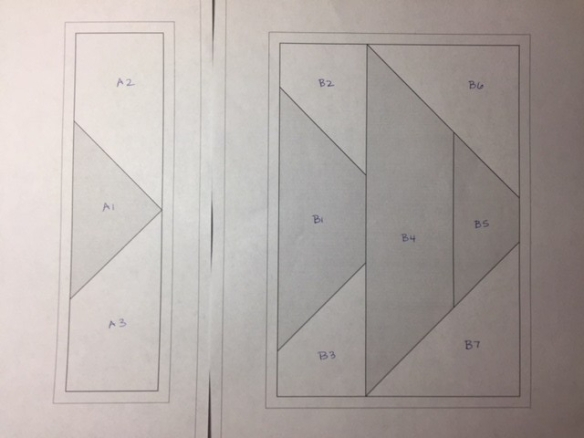
This is the block I am going to demonstrate for the tutorial.

edge block

It has an A part and a B part.  I am going to make the B part here.

img_9478.jpg

So, let’s get started.

img_9434.jpg

Cut out all the foundation paper patterns for the quilt top. Note that E is spread over two pages so you’ll have to match and glue the two pieces together.

img_9435.jpg

Cut out all templates and fabric.

But remember, we’re just doing B here.  So,

IMG_9436

Here is foundation pattern B and fabric for each B template. Start with piece B1. Remaining pieces are in order… B2, B3, B4, etc. Notice where piece B1 goes on the foundation pattern.

IMG_9437

Flip the foundation pattern over, and center fabric piece B1 where it belongs. Fabric piece B1 should be face up, and the lines on the paper should be face down.  Hold fabric and paper up to the light to make sure the fabric covers the pattern with an approximate 1/4″ overage all the way around.  You may want to either glue or pin the piece in place.

IMG_9439

Flip the paper over keeping the fabric in place on the back side. Line up a straight edge on the line between piece B1 & B2

img_9440.jpg

fold paper over on that line

img_9441.jpg

Using an add-a-quarter ruler trim off any excess. I had very little to trim in this photo.


IMG_9442

Flip paper to back side.  With B1 & B2 right sides together, line up edge of piece B2 with trimmed edge of B1. While holding fabric and paper together, flip paper over and…

IMG_9449

stitch on the line between B1 and B2. Be sure to start and stop stitching 1/4″ before and after the line.

IMG_9444

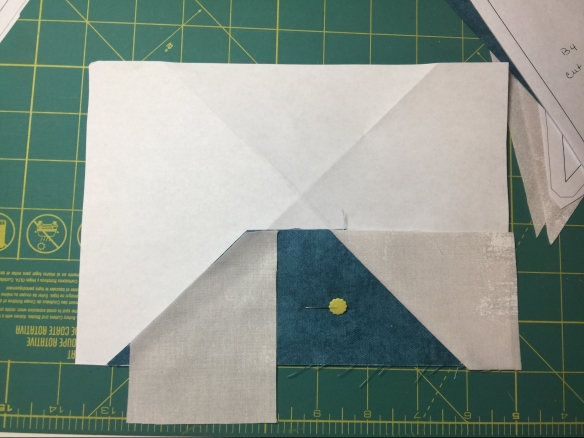
This is the fabric side of the block once B1 & B2 are sewn together. Flip up piece B2 and press.  If you want to make sure you did it right, hold up to light and make sure piece B2 covers the area with approximate 1/4″ overage all the way around.

img_9446.jpg

Place straight edge on line between B1 &B3, fold over paper, and trim any excess using add-a-quarter ruler

IMG_9447

With right sides together, line up edge of B3 with trimmed edge of B1. While holding fabric and paper together, flip paper over and…

IMG_9448

stitch on the line between B1 and B3. Be sure to start and stop stitching 1/4″ before and after the line.

IMG_9482

Flip up B3 and press. This is what it should look like with B1-B3 sewn on

IMG_9450

Using a straight edge, fold paper on line between B1/B2/B3 & B4. Trim excess using add-a-quarter ruler.

IMG_9452

Align B4, right sides together, with trimmed edge of B1/B2/B3.  This is quite a large piece, so I decided to pin before flipping over to stitch.

IMG_9454

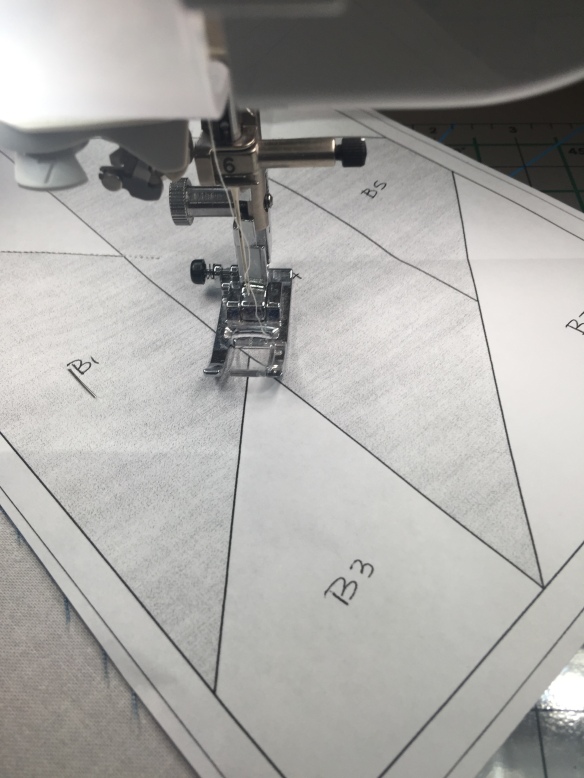
Flip paper over and stitch along line, being sure to start and stop sewing 1/4″ on each end of the line.

IMG_9484

Flip B4 up and press

IMG_9455

Fold back paper between B4 & B5 and trim using add-a-quarter ruler.

IMG_9457

Align B5, right sides together, with trimmed edge of B4.

IMG_9458

Stitch on line between B4 & B5, being sure to start and stop sewing 1/4″ on each end of the line.

IMG_9459

Flip up B5 and press

img_9460-e1519696133238.jpg

Fold along line between B4/B5 & B6. Trim using add-a-quarter ruler

IMG_9461

Line up B6 along trimmed edge, right sides together

IMG_9463

Stitch along line, being sure to start and stop sewing 1/4″ on each end of the line.

img_9464-e1519696516832.jpg

Fold along line between B4/B5 & B7. Trim using add-a-quarter ruler

IMG_9467

Line up B7 along trimmed edge, right sides together, and stitch along line, being sure to start and stop sewing 1/4″ on each end of the line.

IMG_9468

Flip up B6 & B7 and press. This is the finished B unit

img_9470-e1519697043377.jpg

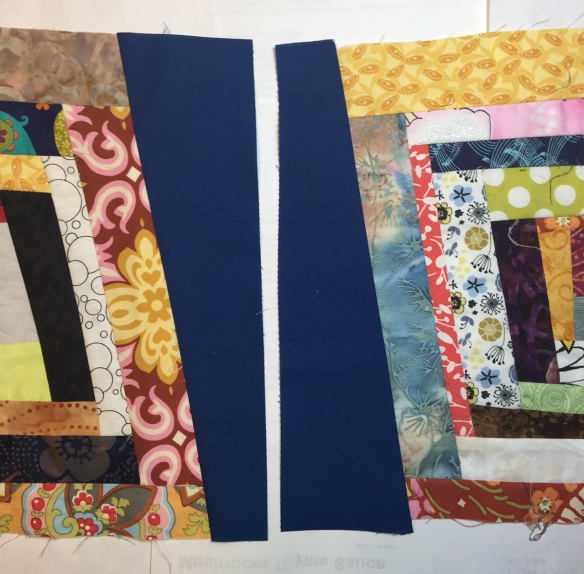
Trim outer edges along the solid line

img_9471-e1519770611285.jpg

Following the same method, make section A and trim

img_9473-e1519770584486.jpg

Place A & B right sides together.

IMG_9474

Stitch along solid line 1/4″ from edge

IMG_9475

Open and press.  Congratulations.  You have made a paper pieced block.

Now, complete the rest of the blocks in the same manner.  For my quilt, you need 20 of the blocks above, and 4 corner units.  The 4 corner units are made in the same way.  They have 3 parts.  Just take it one step at a time to complete each part, and then join the parts together.

The paper is removed from the back of each block once the quilt top is completed.


Arrows Quilt

I’m so excited.  Today is my day to share on Christa Watson’s blog tour for her new book Piece and Quilt with Precuts.

I chose to make the arrows quilt a bit smaller than the one on the book.  I left two rows off the side and a row off the bottom so my quilt ended up being 66″ x 72″.  I used 7 fat quarters from Alison Glass 2015 & 2016 Sun Print collections and about 4 yards of various Grunge whites for the background.  Even after making the arrows, I still had enough of the fat quarters to make a scrappy binding.

yes I laid on the grass to take this picture

The quilt was super quick to cut and piece.  I think I have no more than 5 hours total in making the quilt top.  Quilting it was another story.  I chose to quilt it the same way Christa quilted hers – with free motion arrows and cursive L’s.  I had not tried either before so I decided this was a great time to learn something new.  The instructions provided in the book were very clear and made learning these two new forms very simple.

Look! The points match! A little bit of extra work, but so worth it in the long run

Her book mentions that both free motion designs are fairly intense so she suggests doing short sessions at a time.  I would agree.  The maximum time I could sit and quilt the arrows was 45-60 minutes.  And even though the L’s seemed easier to quilt to me, I could only keep the motion going for about 20 min before they started looking funky.  In total it took me about 10-12 hours to quilt the entire thing on my domestic machine.

I backed the quilt with this fabulous Allison Glass print from her Ex Libris collection that perfectly matches the front.  So three different Alison Glass collections in one quilt and they all go together like they were meant to be. It also shows some of the quilting.

GIVEAWAY CLOSED.  MaryD is the winner ** GIVEAWAY #1 **  I’m giving away an electronic copy of Christa’s new book here on my blog courtesy of Martingale Publishing.  Just leave a comment telling me your favorite quilt from Christa’s new book, and if you have a private account be sure to leave your email as well.  Giveaway open through August 31.

Or you can buy a copy of Chrita’s book from her shop.  Trust me  You’ll love it.

GIVEAWAY CLOSED ** GIVEAWAY #2 **  On my Instagram account, I’ll be giving away a fat-quarter bundle of the Allison Glass prints that I used for the arrows.  Check out my Instagram feed for info on how to win.  I am @monkeyneedle.

And I would be remiss if I didn’t mention that you need to check out the other great bloggers that have participated in this fun blog hop.  A full list is below.

FRIDAY AUGUST 18 – SQUIGGLES

Kathy Bruckman Blog: Kathy’s Kwilts and More IG: @kathyskwiltsandmore
Kate Colleran Blog: Seams Like a Dream IG: @seamslikeadreamquilts
Sharon Parcel Blog: Yellow Cat Quilt Designs IG: @punkydoodle53

Click here to see Christa’s version of Squiggles.

SATURDAY AUGUST 19 – GRIDWORK

Sandy Maxfield Blog: Sandy Star Designs IG: @sandystardesigns
Joanne Harris Blog: Quilts by Joanne IG: @turtlequilterjo
Teresa Mairal-Barreu Blog Sewn Up: IG: @teresadownunder

Click here to see Christa’s version of Gridwork

MONDAY AUGUST 21 – FREQUENCY

Nancy Scott Blog: Masterpiece Quilting IG: @masterpiecequilting
Martingale’s Blog: Stitch This! IG: @martingaletpp
Lorinda Davis Blog: Laurel Poppy & Pine IG: @laurelpoppyandpine

Click here to see Christa’s version of Frequency

TUESDAY AUGUST 22 – S.W.A.K.

Sherry Shish Blog: Powered by Quilting IG: @poweredbyquilting
Michelle Bartholomew Blog: Michelle Bartholomew IG: @michellebartholomew
Allison Dutton Blog: Allison Sews IG: @allisonsews

Click here to see Christa’s version of S.W.A.K.

WEDNESDAY AUGUST 23 – STARSTRUCK

Lissa LaGreca Blog: Lovingly Lissa IG: @lovinglylissa
Sherri Noel Blog: Rebecca Mae Designs  IG: @rebeccamaedesigns
Sandra Healy Blog: Sandra Healy Designs IG: @sandrahealydesigns

Click here to see Christa’s version of Starstruck

THURSDAY AUGUST 24 – DOT’N’DASH

Laura Piland Blog: Slice of Pi Quilts IG: @sliceofpiquilts
Cheryl Brickey Blog: Meadow Mist Designs IG: @meadowmistdesigns
Jen Frost Blog: Faith and Fabric IG: @faithandfabric

Click here to see Christa’s version of Dot’n’Dash

FRIDAY AUGUST 25 – TWINKLING DIAMONDS

Jessee Maloney Blog: Art School Dropout IG: @jessee_artschooldropout
Jessica Caldwell Blog: Desert Bloom Quilting IG: @desertbloomquilting
Anjeanette Klinder Blog: Anjeanette Klinder IG: @anjeanetteklinder

Click here to see Christa’s version of Twinkling Diamonds

SATURDAY AUGUST 26 – WINDOWS

Terri Vanden Bosch Blog: Meanderings Along Lizard Creek IG: @lizardcreekquilter
Suzy Webster Blog: Webster Quilt IG: @websterquilt
Katie Joy Church Blog: Wild Prairie Studio IG: @katie_joyquilts

Click here to see Christa’s version of Windows

MONDAY AUGUST 28 – KITES

Pam Cobb Blog: The Stitch TV Show IG: @thestitchtvshow
Jen Rosin Blog: A Dream and a Stitch: IG: @adreamandastitch
Rashida Khanbhai Blog:  No. 3 Quilt Studio IG: @no3quiltstudio

Click here to see Christa’s version of Kites

TUESDAY AUGUST 29 – ARROWS

Lynn Kline Blog: Monkey Needle IG: @monkeyneedle
Kathy Bruckman Blog: Kathy’s Kwilts and More IG: @kathyskwiltsandmore

WEDNESDAY AUG 30 – SPOOLS

Jen Shaffer Blog: Patterns by Jen IG: @patternsbyjen
Sandra Starley Blog: Textile Time Travels IG: @textiletimetravels

Thanks for visiting!

Scrappy Wonky Log Cabin Quilt Top

I finally finished my scrappy wonky log cabin quilt top, and I HEART everything about it!!  I love the scrappiness!  I love the wonkiness!  And I love how the bright blue solid brings it all together.

IMG_7329

You can read about why I started this adventure here.  I share some tricks with you in making wonky blocks here.  And I share with you how I squared up the blocks here.

IMG_7325

Now it just needs to be quilted and bound.  I plan to quilt it sometime in August.  I’m thinking an all over edge-to-edge design will do just fine.  There is already a lot going on in this quilt, so it doesn’t need anything fancy.

IMG_7322

Although I love this finished quilt, now that the top is finished and I can get a good look at the whole thing put together, I think it would look really neat to make the wonky blocks in a wider range of sizes.  Most of the wonky blocks finished at 11-12″ and then I added the blue to make a 13″ finished block.  But it would also look great if some of the wonky blocks finished at 6″ or 8-9″.  And then to not center the wonky block into the blue 13″ square but offset it a bit.  There would be more solid blue in the quilt, but the variety of sizes, and offsetting the wonky blocks, could make the quilt more visually interesting.  Hmmm… I might have to make another one day.

And that’s another thing I love about quilting.  You can finish a project and completely love the way it is, and then think “if I change it up a bit here and there, how great would that be?”  I never run short on ideas when it comes to quilting.  I only run short on time.

Linking up with Can I Get a Whoop Whoop at Confessions of a Fabric Addict and  Finish it Friday at Crazy Mom Quilts.

Squaring Up Wonky Blocks

Remember the wonky log cabin blocks I’ve shared with you the last couple of weeks.  Well I have all 35 blocks made now, and some of them are very wonky.  I auditioned several different colored backgrounds based on solids I had on hand already.  I decided I really liked the darker blue backgrounds.  The blue I chose ended up being the one I had the most yardage of.  I really liked the other one better, and I might have had enough, but it was just too close to be sure and I didn’t want to get 90% done and then run out.

Turning them into a square, rather than a wonky, 13 1/2″ block has proven to be challenging.  Not because it’s hard, because it’s not.  I could just cut a strip the width I need (3″ wide should be largest enough for most sides), sew around all 4 sides, and then trim to be square discarding the parts that I trimmed off.  That would be easy, but it would create a lot of waste and a lot of new scraps. In the example below, the piece I cut off is approximately 1 3/4″ on one end, and 0″ on the opposite end.  Which basically means I can’t use this scrap  on another block and it will have to go in the scrap bucket.  Oh the horror!

FullSizeRender (4)

Remember the whole point of this was to use my scraps, not create more.  So I have been challenged in how to square up each block with as little waste as possible.  I started out trying to use a spreadsheet and that didn’t work.  Eventually I moved on to a post it note that I could pin to each block.  Still took me a bit to figure out how to measure what each block needed.  Don’t worry about trying to figure out this mess.  I’ll give it to you in a nutshell below.


What I have come up with is to pair up the squares, and then to cut the strips wide enough so that what is cut off of one block is close to the right size to fit on a different block.

FullSizeRender (5)

pair blocks with similar but opposite wonkiness (is that even a word??)

I put the block on the left under the ruler centering it as best I could between the 13-1/2″ finished square size that I wanted.  I’m working with just the right edge of that block right now.  It measures 2-1/2″ from the top edge and 1″ from the bottom edge. (see below)  Add 1/2″ to both of those numbers for the seam allowances for each fabric, and that means I need a piece 3″ wide on the top and 1-1/2″ wide on the bottom to finish the right edge of this block.  The left edge of the other block I measured the same way, and for it I needed 1-1/2″ on the top and 2-3/4″ on the bottom (no picture).   So I took either the top or bottom measurements, which ever were the largest in total and then added 1/4″ for safety.  In this case, the top measurements were the largest so 3″ left block + 1-1/2″ right block + 1/4″ for safety means I need to cut the strip 4-3/4″ wide.

FullSizeRender (14)

Here is my 4-3/4″ wide strip between the blocks.

FullSizeRender (6)

Cut a wide strip

FullSizeRender (7)

Sew to one size. Cut off amount not needed

FullSizeRender (8)

Sew to opposite block

I might trim 1/8″ off each of these in the end (remember we added 1/4″ for safety).  Also, this method is taking about 10 times longer than it would otherwise, but at least I won’t have much wasted fabric when I’m done.  So, in that manner, I’m meeting my goal.

Also, since I cut a strip 4-3/4″ by WOF (width of fabric), I still have about 34″ left of that strip after the two blocks above.  So I matched up more blocks that needed that same width (or close to it) and did the same thing with those blocks using up that entire strip I just cut.  Do this same thing for all 4 sides of each block.  I made 35 blocks, so in this case that’s 140 sides!

Let me know if you would like to try this or if you have questions on how this is done.  I can write up more detailed instructions.

Now to work on squaring up more of these blocks.  I’m ready to get this thing put together.

If you want to read about how (and why!) I started this scrappy log cabin adventure click here, and I share some helpful tips and tricks here on working with wonky blocks.


Scrappy Wonky Log Cabin Blocks – Hints & Tricks

Last week I shared with you the Scrappy Wonky Log Cabin blocks that I was starting with the gazillion scraps from my 1″ scrap bucket.  As I was working on these scrappy wonky blocks, I thought of several hints and tricks that might help should you decide to also make some of these blocks.

  • If sewing a strip to the block and there is an acute angle on a corner to which the strip will be sewed (in the block below both corners along that top edge are acute angles), or an angle pointing out, make sure you use a longer strip to account for extra length needed on that new strip when trimming.  If I had used the same length of strip as the widest point on the side of this block before the new strip, it would have been too short if wanting to keep that same angle once trimmed.
  • If scrap is a weird shaped, trim sides of the scrap first and then trim long edge based on where the straight edge of the sides ended.
  • Trim the whole side, not just the end of the last strip sewed on.  Sometimes, due to fabric stretching or not a completely straight piece of fabric, there is a little extra that needs to be cut off to make that side straight for the next strip.
  • If the block is getting too wonky, and you want to square it up a bit, you can do that too. In this first example, my block is a bit too rectangular, instead of square, so I just needed to plan what the next couple of strips would be.  By planning to sew a more narrow strip to the side and then a wider strip to the bottom my block will be more square once those strips are trimmed.

Then in this example, my block is getting too wonky.  The top is much thinner than the bottom, and after another round or two and it will be a triangle.  Not a bad thing, but not what I am wanting here.  So, I sewed a wider strip to one side, and then purposely trimmed that strip at an angle such that the wider portion is at the top of the block where the block was slimmer, and the thinner portion of the strip is at the bottom of the block where the block was wider.  Although the other (left) side of the block is still not squared with the rest of the block, the block as a whole reads more square than triangle now.

After 3 rounds, my smallest block is approximately 6-3/4″ x 7″ and the largest block is approximately 7-1/2″ x 8″

FullSizeRender (12).jpg

Next week I’ll share with you how I’m squaring these blocks up to the same size so I can sew them together to make a complete quilt top.

Wonky Houses & Trees Quilt

I have shared with you before that I am a member of a group with do.Good Stitches that makes charity quilts.  The group that I am a part of donates our quilts to Enchanted Makeovers, a non-profit organization that updates, or makeovers, shelters for abused women and their children.

It’s has taken me a while to get this quilt finished.  Well, that’s somewhat true.  It did take me several months to get it finished, but then it took at least that long to get pictures of it. I didn’t have a good way to take pictures of larger quilts (this one is twin size).  My honeyman was making something for me to hang large quilts from for picture taking, and he took his sweet time.  But we finally finished so I was able to get some pictures and am now able to share this fun quilt with you.

I asked each member of the group to make a wonky house and a wonky tree.  It could be pieced, paper pieced, or applique. There was complete freedom there.  I also didn’t want it to follow a pattern.  I wanted it to be very improv.  So I didn’t provide them with any instruction other than the idea below.  I designed this in excel when I was away from EQ7, so it is very rough.  But it’s gives you a good idea of what I was looking for.  (Bet you never thought of use excel to design quilts!)

30077816514_d7db55bf29_n

The finished blocks only needed to be within a certain size range.  The idea was to fill in the space between the blocks with scraps of fabric to keep the ‘improv’ look throughout the quilt.  I regretted that decision!  It turned out great!!

Ok, so it did take me a while to fill in all the spaces.  It turned out to be much easier to do on excel, than to actually do it with fabric.  I did a LOT of rearranging of the squares and a LOT of measuring.  Followed by a LOT of praying when cutting into the fabric just hoping it would be the right size.  And then I had to get very acquainted with partial seams.  And sometimes I even had to take out a seam and adjust things.

Here I am in the middle of trying to put it all together.  I have the left half done.  Just have to do the right half.

IMG_6321 (2)

Whew!  I finally got it together and quilted.  I love how FUN it turned out to be.

IMG_6989 (2).JPG

Here is a close up of some of the blocks.  I quilted it with a meandering loop-d-loop.  And I washed it before taking pictures so it has a wonderful crinkly look and feel.  I could just snuggle up under it.

I also asked each member to make a fun additional block if they felt inclined.  And one member did.  She sent me a really cute dog.  Since I didn’t have others, I found it very challenging to fit it on the front of the quilt, so instead it because the honorary quilt label on the back.

IMG_7001.JPG

A special thanks goes to A Stitch in Time quilt shop in Franklin, NC, for providing the fabric for the back and binding.  If you’ve never been to this shop you really should make a special trip.  It’s one of the most beautiful shops I’ve even been in, and the people are just the nicest!

Measures 70″ x 90″.

Linking up with Can I Get a Whoop Whoop at Confessions of a Fabric Addict and  Finish it Friday at Crazy Mom Quilts.

Scrappy Wonky Log Cabin Blocks

A couple of weeks ago I was working on scrappy heart blocks for a charity bee that I am part of.  I was buried deep in my 1″ scrap bucket (Strips and pieces that I can make at least a 1″ square with.  But in no case no larger than 1-7/8″ wide.  Once they reach 2″, they go in the 2″ scrap bucket.)  I used almost 200 pieces in these blocks, and other than the fact that there were scraps everywhere, on every flat surface and strewn all over the floor, when I put them back in the bucket you couldn’t even tell that I used any.  The bucket has been overflowing for a while and I really couldn’t fit another scrap in it.  I love how pretty these hearts turned out to be, but they honestly didn’t make a dent.IMG_6973 (2).JPG

So, I decided right then and there that I needed to make a quilt with those scraps.  Since it was mostly full of strips, I decided to make a scrappy log cabin.  This is only a small portion of the strips that I started with.  My first thought was to use this as a leader-ender project.  But once I started, I couldn’t stop!

IMG_6965.JPG

As I started forming the blocks, rather than squaring up the block with each round, I would let the fabric decide how the block would be shaped since I wanted as little waste as possible.  Some strips were cut straight across, whereas others were cut at an angle. And if they were cut at an angle, I just left it there.  I did trim them to create a straight line I could sew another strip to, but I didn’t trim to 90 degree angles.  So not only were my blocks scrappy, but they were turning out to be very wonky as well. This is what they looked like after just 2 rounds.

IMG_6971 (2).JPG

The plan is to stop when they reach approximately 11-12″, and then even them up with a solid color to be 13 1/2″ square. I have 23 blocks started above but will need 35 blocks at 13″ sq each to make a twin size quilt.

So what are you working on?

Continue to read below if you want more detailed instructions in how I’m doing this.

For each block, I started with a 2″ square and various lengths of strips.

IMG_7083

Start with 2″ sq center and various length of strips to go around.

Also, since this method required a lot of trimming and ironing, I have a smaller cutting mat, ruler, and rotary cutter right beside my sewing machine, and the iron is just behind me.  All I have to do is rotate my office chair and roll about 6″ to reach the iron.  This saves me a lot of time because I’m not getting up every 10 seconds to walk to my normal cutting station.

IMG_7085

Cutting mat, ruler, and rotary cutter right beside my machine

IMG_7086

Start by sewing the shortest strip to the 2″ square and trim off both ends to create straight edges. Press the seam towards the strip just sewn on (always)

IMG_7087

Sew on the next strip. Press the seam towards the strip just sewn on. Here you only need to trim the one edge where the next strip will go.

IMG_7088

Sew on the next strip. Press the seam towards the strip just sewn on. Again, trim just the edge where the next strip will be sewn on

IMG_7089

Sew on 4th strip. You can see we have circled the 2″ square doing first one edge, then the next, then the next, then the next. I went in a counter-clockwise direction here, but you are welcome to go in a clockwise direction (see the 23 blocks above.  I sewed those in a clockwise direction). Whatever works for you. What makes this a log cabin is that you continue to circle the middle square in this manner rather than sewing strips to opposite sides or jumping around to whatever side suits your fancy at that moment

IMG_7090

Before we sew on anther strip to start the 2nd go-around, we need to trim all edges to be straight. You can see that I did not bother to trim the strips all to equal widths. I could do that and create a square log cabin block, but when I trim them this way, leaving any angles that were already part of the strip, this is what creates a wonky block.

In the example below, it’s time to sew on another strip and start another trip around the block again.  I have another piece of fabric that is cut at an angle.  Depending on which way I decide to sew this on, I can create wonkiness on another corner.  In this instance, I think I like the one on the left best but that really is a personal preference.  Sewing it on the other way would not be wrong, just different.

Tune in next week for an update on how this is coming along.


Finish-A-Long Q2 2017 Goals

Time to set my goals for the second quarter Finish-A-Long.  I did finish one of my quilty goals from 1st quarter, but then forgot to link it up to the linky party.  That’s ok though.  A finish is still a finish and worth celebrating!

I finished this quilt that was part of a design and challenge that I did for Quilt Design a Day.  You can read about it here.

img_5746-2


Last quarter we talked about making your goals SMART – specific, measurable, achievable, realistic, & trackable.  You’re more likely to reach those goals and less likely to get sidetracked with extra stuff when you do that.  My goals are specific, measurable, and trackable.  However, they are probably not realistic or achievable in that I don’t think they will all be finished in the next 3 months, but maybe by the end of the year.  So, yes, I will still call them goals.

I had the wonderful opportunity to attend QuiltCon in February, and now I have a whole other list of other quilty goals – designing, teaching, learning, etc. – to work on.   But that’s for another day.  Today is about the quilts I need to finish as part of the Finish-A-Long.

So, here goes…  From last quarter:

Finish improv quilt.  About 1/3 – 1/2 done with piecing top.  It’s improve.  No real plan, so I really won’t know it’s finished until it tells me.

IMG_3288

This quilt top needs a back, to be quilted, and then bound:

DSC_0059

This quilt top needs a back, to be quilted, and then bound:

img_5687

This table runner needs a back, to be quilted, and then bound:

img_5688-2

These blocks need to be joined into a quilt top, then backed, sandwiched, quilted and bound.

img_5220

Finish quilting and then bind these Fall placemats

img_5691

Finish Hoopsisters Mystery 201? quilt.  About 12 blocks done.  Need to finish all blocks, then put together, and bind.

IMG_5692 (2).JPG

I have 80+ of these blocks that need to be turned into a quilt.

img_5693-2

And my oldest UFO… finish hand quilting this King size monster.  And the fact this it is ‘hand quilted’ is why it isn’t finished.  LOL

img_5694

And a new quilt that I started… Finish this rainbow quilt.  Top is done.  You are seeing just a small part of it.  It needs to be sandwiched, quilted, and bound.

IMG_6455

Wow!  This list is a bit overwhelming.  These are not all my UFO’s, but they are the ones I could easily put my hands on.  And it’s ok if I don’t finish them all.  But at least they are now on my radar.  They are written down, and now I am more likely to finish them.

Of course there are other items on my list.  I have several bee blocks to do. I’m still working on Splendid Sampler blocks.  I am working on designing several blocks and quilts.  And I am doing the Riley Blake Creative Rockstar challenge.

Since tax season is almost over, maybe I can get more than one of these quilts finished this quarter.  That would be nice.  Although the garden is calling… So, maybe not.

What are your goals?  Write them down.  Make them SMART (specific, measurable, achievable, realistic, & trackable) and let’s see how much you can achieve!

Linking up with 2017 FAL – Q2 at She Can Quilt.

Flaming Star

If you follow me on Instagram (@monkeyneedle), you may recall last summer and early fall when I was working on a ‘secret’ project.  Well, I am so EXCITED that I FINALLY get to share it with you. I HAVE JUST BEEN PUBLISHED IN A MAJOR QUILTING MAGAZINE!  My quilt is in the March/April issue of Quiltmaker magazine by Fons and Porter.  EEEEEKK!!!

Introducing FLAMING STAR.

img_5810-1

It is amazing how long it takes to get through all the steps: design, submission, acceptance, making the quilt, quilting the quilt, mailing it to the magazine so they can take pictures, write the article, and then make it part of an upcoming issue.  Whew!

I designed this quilt about 15 months ago.  It took me about 3 months to get up the nerve to submit the quilt design to a publishing company.  And then it took about 6 months for them to say they wanted to use it.  Things moved faster after that.  I spent about 6 weeks piecing the quilt, and then sent it off to the quilter who had it about 4 weeks before she was able to get to it.  Then in the mail it went, and about 3 months later it was returned to me.

THE FABULOUS LONG-ARM QUILTING on this quilt is by Andrea Walker at Walker Quilt Co.  Her work is just AMAZING!!  Go check her out.

img_5819-2

I really wish I could have taken a few more pictures.  We had a snow storm moving in and it was extremely windy.  Right after I snapped the picture below, the wind ripped the quilt from the XL binder clips holding it and it went flying through the air.  I caught it on my head.  It was quite funny!  Getting it clipped up in another location for more pictures was also not working.  So, maybe another day.

img_5823-2

It’s all about color placement!  The quilt is designed using just two simple blocks.  Each block is 14″ square. It looks more complicated than it really is.  The color placement gives it the striking look.  I’m usually not big on borders, but in this case I added a 3 1/2″ border (1/4 the block size) and carried the design into the border in certain areas.  I then faced the quilt, rather than binding it.  I have been doing that for many of my quilts lately if I don’t want a ‘frame’ around the finished look of the quilt.

Pick up a copy of the magazine at your local stores today.  My quilt got a small inset on the front cover (top right corner), the full quilt just inside the front cover, and a whole layout with directions on how to make you own version on pages 30-35.

Fabrics: All Kona Cotton Solids in white, shadow, steel, Jamaica,  Bahama blue, robin egg, baby blue, and coral.

Measures: 77″ x 77″.

Linking up with Needle and Thread Thursday at My Quilt Infatuation, Can I Get a Whoop Whoop at Confessions of a Fabric Addict and  Finish it Friday at Crazy Mom Quilts

From Design to Reality

I am part of Facebook group called Quilt Design a Day.  The goal is to design one quilt each day based on the prompt for that day.  I haven’t yet found the time to participate on a daily basis, but I do participate here and there.  One of the prompts last year was the following picture.  We were to design a quilt and then make the quilt for possible acceptance into a special exhibit at QuiltCon in Savannah next month

qdad-quilt-con-spark

Photo credit: Michelle Wilke                         @ Factotum of Arts

I started playing around with the different lines.  I design in EQ7 and love how flexible the program is.  I can design multiple variations of the same quilt and save the block and the quilt to go back and look at later.  Originally I decided to play with the black and white angles, and maybe a little bit of the windows.  Here are 3 quilt possibilities that I started with.

mosaic

Then I decided that I wanted to play with the windows a bit more and came up with this.

maybe

But that felt too heavy to me.  The windows were just too block-y.  What if I turned them on-point?  I turned them, played around with them a bit, and came up with this.

fractured

I like it, but it’s still not quite right.  What if I elongate it?

capture

YES!!!  I LOVE IT!

Then I had to make it…  Of course, it took longer than I thought it would.  Of course, it was a headache in many ways.  The angles were quilt difficult to line up.  I made a smaller version than I really wanted because I started it just 2 weeks before it was due and I was afraid I wouldn’t be able to make a large quilt in that time period given that I also work full-time.

And… I didn’t finish it!  If I had had one more day, I could have finished.  But I didn’t.  Oh well.  At least I finished and it didn’t join the long-term UFO pile.  And any finish is reason to celebrate.

img_5745-2

I wanted to do some special quilting on it.  Sometimes I like a bit of design in the quilting rather than just a straight line or an all-over meander.  This is probably the reason I didn’t finish the quilt by the deadline, but I love the way it looks.

img_5802

Here is the back.

img_5803

Measures: 34″ x 47″

Fabrics: Kona Cotton Mediterranean, Kona Cotton Prussian, Kona Cotton Carrot, Kona Cotton Snow, and Kona Cotton Shale.

Linking up with Can I Get a Whoop Whoop at Confessions of a Fabric Addict and  Finish it Friday at Crazy Mom Quilts